Showing posts with label Crafting. Show all posts

Friday, November 11, 2011

Someone Lives in My House!

First of all, it is 11/11/11 and I am posting this at 11:11am.  By the way, this is officially the best day (and minute) ever because 11 is my favorite number.  Who cares that it was a full moon last night and my students are nutso?  Anyway...

I will be the first to admit:  I'm not much in a garden.  I'm not much of an "outside your house" decorator.  I wish I could do better... maybe next spring and summer.  But it occurred to me the other day as I was driving up to my house on my way home from work that someone could literally walk by my house and assume that it was abandoned.  There is absolutely not one personal "thing" outside our home that would make a passerby assume that someone lived there.  I hope to eventually put a bench or some rocking chairs on the front porch with a tiny end table so I can sit out there in the summer and drink my morning coffee.  Wouldn't that be nice?  But for now I was on a tight budget.  So I thought a wreath would be appropriate.  I love wreaths.  Outside only.  And I would love to have a collection of wreaths that I can swap with seasons/moods.  This is officially Wreath #1 Post.

I was inspired on Pinterest by a bunch of felt rosette wreaths like this one:

Pinned Image

and this one:

Pinned Image

And believe it or not, I did it! And it cost me less than $6.  I bought one grapevine wreath and 5 pieces of felt, spent about one hour on the floor with scissors and a hot glue gun and I came up with this:


It's so easy.  Cut out a circle of any size.  I chose a few different sizes.  Cut a spiral from the outside and keep going until you get to the middle.


Simply roll it up from the outside in.  Glue it at the end and glue it to the wreath.  It's that easy.  And now it looks like someone lives here:


I love it.  Even Josh loves it.  And he usually thinks that my DIY/craft projects turn out like kindergarten art.  And now it looks like someone lives here.  And I am on my way to having a multitude of wreaths that I can switch out whenever I want.  By the way, did you notice the porch "ceiling"?  Look, it's beautiful:


Beautiful hardwood!  It's awesome and we love to look at it.  We want to stain it next spring. It needs to be kept up so it will stay nice.  Happy weekend!

Saturday, September 17, 2011

Before and Oh-So-After!

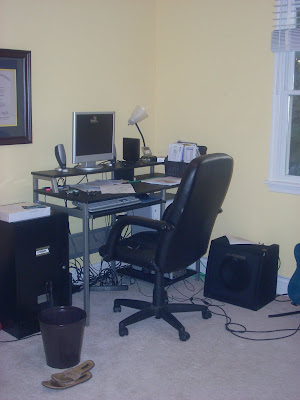
Thank goodness I did something about this crazy office.  In the last post I told you that I painted one of our small bookshelves, but didn't give you the final product yet.  Well, I am happy to announce that our office went from this:


to this!: 


A little better, right?  The other day, Josh was at band practice (he is the percussion instructor for a local high school marching band) and while he was away I totally re-did the office in two hours and then surprised him when he came home.  He was shocked that I did it all on my own (especially moving the heavy stuff).  I moved the desk from the left wall to the wall with the window so I could look outside while I worked.  It has, of course, proven a distraction.  Especially when the neighbors are playing football.  I added a small table we already had with a lamp we already had in the corner.  I kept the filing cabinet out, even though I hate it.  This "oh-so-after" room is really just an "in-progress-but-way-better-than-it-was" room.  And where the desk used to be:


The new bookshelf!  Well, it's actually an old bookshelf, but it's freshly painted, so it's kind of new.  


Even though we need storage for all of our books, I really didn't want to crowd our clean bookshelf and once again make this room feel tight and over-stuffed.  So I opted for a few books and other random stuff.  Josh doesn't understand why we would have a book shelf if we aren't going to have books on it, but I totally get it. And in the future, I will probably either paint the other bookshelf and add it in here, or get something bigger or put shelves on the walls for storage for office-type-stuff, books, and school work stuff.  But here are some close ups of my happy, neat, and clean bookshelf:


Some things to note: 
  1. On the top shelf, there is a stack of books.  That stack of books is so random that it includes: "The Purpose Driven Life", a Lewis Black book called "Me of Little Faith" (I know, ironic), a book titled "Stumbling on Happiness" (also ironic), "Catch-22" and "Day Trips in Delmarva".  I swear that was an accident.
  2. The big round vase on the top is awesome.  It is by far my best vase.  And I have a lot.
  3. The art hung above the shelf is only there because it is the 2-D version of the teal vase in the shelf.  I made that art with a bunch of paint chips.  I cut them up into same size squares and glued them on a thick piece of paper and then framed it.  My inspiration came from this DIY art from paint chips.  It didn't come out perfect (you can see the imperfections in the picture) but I don't think it's too horrid.  Josh, however, was not happy that it was on our wall.  He called it "kindergarten art".  He is lucky I love him.
Speaking of paint chips, I went to (almost) all of the local paint stores and picked up some paint chips for our living room.  And by some I mean a lot:


And we couldn't really find one that we like!  AHHH!  So we picked up more:


And still haven't found one.  Shucks.  So, the in-laws are here today visiting for the weekend.  Josh and his dad are going to a sports bar to watch the Mountaineers game shortly since we won't get it on cable today.  I think that while they are gone, Josh's mom and I will go to the only paint stores left on the Eastern Shore (Home Depot and Sherwin Williams) and pick up the rest of the teal-ish paint chips left in the world and hopefully find one we like.  

Then the plan is to go out for crabs for dinner before it's winter and we can't get them anymore.  We go to a local crab house right on the Chesapeake Bay.  They say that Maryland crabs are best in the fall, so we will see!  

Have an awesome weekend!

Thursday, August 18, 2011

I'm a Closet Blogger

Big News!  I am featured as a guest blogger on friend Mrs. Puma's blog today!   My closet is officially the first room in our house that is completed.  Check out my post on Puma Life:

Sunday, August 7, 2011

A Soldier Will Fight Long and Hard for a Bit of Colored Ribbon

--Napolean Bonaparte

Yeah, he quoted that.

***Disclaimer: No, I didn't actually do this project while on vacation in the Outer Banks of North Carolina.  I wrote this post a few days ago and just didn't get to post it until now. Enjoy!

On to the point... there is a blog called young house love that is all about home improvement and design.  I read it occasionally because there is some really cool stuff and the husband and wife that write the blog are hysterical. I found this post about a ribbon chandelier that the mom made for her baby daughter's closet.  So I gave it a go.

I wanted to find some ribbons that would go with my spring green theme and still coordinate with the ribbon that I used on the flip flop hangers.


So, as usual, I went to Michael's.  I happened to be at my mother-in-law's house at the time of the proposed project, so she joined me for our outing to the Michael's in York, PA.  We looked only in the $1 clearance ribbon basket and found these goodies:


Looks pretty good, huh?  I also found a 9-inch embroidery hoop while I was there.  I only used the inside piece and painted it white (on my MIL's ironing board).


After the paint dried, I strung some thin, clear bead ribbon around it from both sides.


I tried to cut the ribbon in the general length that I wanted, but still making them all different lengths. 


I used glue dots and little green sparkle things and hung it in my closet so it is the first thing I see when I open the closet door.


Now, I know what some of you are thinking.  I sound like a little girl, right?  This was originally something that was supposed to be for a baby's room, right?  Yes, yes, I thought of all of that.  And I dismissed it completely.  Because I smile every time I see it :-)

Friday, August 5, 2011

Uh Oh... I Went Back to Michael's

And I bought some awesome spring-green stuff for my closet. It's kind of like contact paper and my shelves needed a face lift.


Easy and quick project.  All I did was apply it right to the shelves and add my shoes and clothes back on!

Thursday, July 14, 2011

Awesome Blossom

That^ title was both inspired by Michael Scott's  love for Chili's Awesome Blossom, and the topper that went on my wedding gift for my best friend's recent nuptials.

Something I will confess:  I am not a particularly crafty person.  I love and appreciate all things "craft", but I have never been interested or motivated to dive into that world.  Until I had an idea for L's wedding gift!

This is foolproof, easy, and can be inexpensive.  You should definitely do it the next time you need to gift someone, whether it be wedding, birthday, bridal shower, baby shower, etc.  Buy the towels from their registry, design them to look like a tiered cake, and decorate with the theme colors!  TA-DA:


It is easier than it looks, I promise!  Watch:

1.  Gather all of your materials.  You will need towels, ribbon, decorations, tape, thick floral wire, and maybe a glue gun.


2.  Now, before you go and ruin the towels you are about to give to someone for their new home, test a little bit of scotch tape on a tiny area just to make sure that it doesn't rip the towel apart when you pull it off.  Mine were safe!  Fold and roll the largest towel to your desired size VERY tightly and tape it together so that you are sure it won't fall apart.  I used the trial and error method on this one to get the size just right.


3. Bend the floral wire in half and slide both ends through the bottom of the bottom tier.


4. Follow Steps 2 and 3 for the second and third tiers.  I found that twisting the wire tight helped to keep everything in place.


5.  Add ribbon of your choice.  L's wedding colors were cornflower and gold-ish, so I chose these ribbons and taped them in the back.


6. Decorate!  Be careful if you need to glue anything.  Make sure it's dry before you put it on the towels!


7.  I found this awesome bouquet of silk flowers at Michael's (you can see them in the top pic) and tore the bottom stems off.  I just shoved the floral wire into the Styrofoam ball that was holding the flowers and VOILA!


It's true that both the bride and groom professed that it was the best gift on the gift table... That's all I'm sayin'...